Need help in the process of creating your own WordPress theme?
If you like, you can watch a video walkthrough below covering steps of this chapter setup.
There is also another video covering “Project setup” and basic git workflow.
Here are the links to necessary tools. Please start downloading them and in the meantime go ahead and proceed with next instructions.
Everyone:
Backend tools:
Frontend tools:
This step is optional, however sometimes it helps to keep the connection alive.
Open file C:\Windows\System32\drivers\etc\hosts in administrator mode
Add the following lines at the end (where CT_SERVER_NUMBER is you CT number)
10.0.0.111 pinky.createit
10.1.0.101 CT_SERVER_NUMBER.phinky.createit
The addresses may change, please ask your project manager for the actual addresses.
First, mount your server space as a local drive.
Basically, what you need to do is:
\\pinky.createit\www\CT_SERVER_NUMBER\ or CT_SERVER_NUMBER.phinky.createit\wwww\CT_SERVER_NUMBER
(replace CT_SERVER_NUMBER with your information, eg. ct11)More detailed instruction can be found here
V:\wp\V:\wp\wp-config-sample.phphttp://CT_SERVER_NUMBER.pinky.createitwp_CT_SERVER_NUMBER, eg. wp_ct11wp_CT_SERVER_NUMBER, eg. wp_ct11ctlocalhostwp_CT_SERVER_NUMBER as a site titleMultisite will allow you to have multiple themes installations at one place.
V:\wp\wp-config.php/* That's all, stop editing! Happy blogging. */
add text: define( 'WP_ALLOW_MULTISITE', true );http://CT_SERVER_NUMBER.pinky.createit/wp-admin/Got stuck? Here’s a Codex tutorial on how to Create a Network
Download the current stable PHP version at PHP Windows
Unzip contents to C:\php\
Rename file C:\php\php.ini-development to C:\php\php.ini
Open C:\php\php.ini and uncomment openssl extension, ie. change line
;extension=php_openssl.dll
to
extension=php_openssl.dll
That’s all
Download PHPStorm EAP . It is an EAP, so you will need to download new version and reinstall it every 30 days.
Run the installer
Check to install: JRE by JetBrains
Install
Run and open File -> Settings -> Version Control -> Git and enter path to installed git.exe
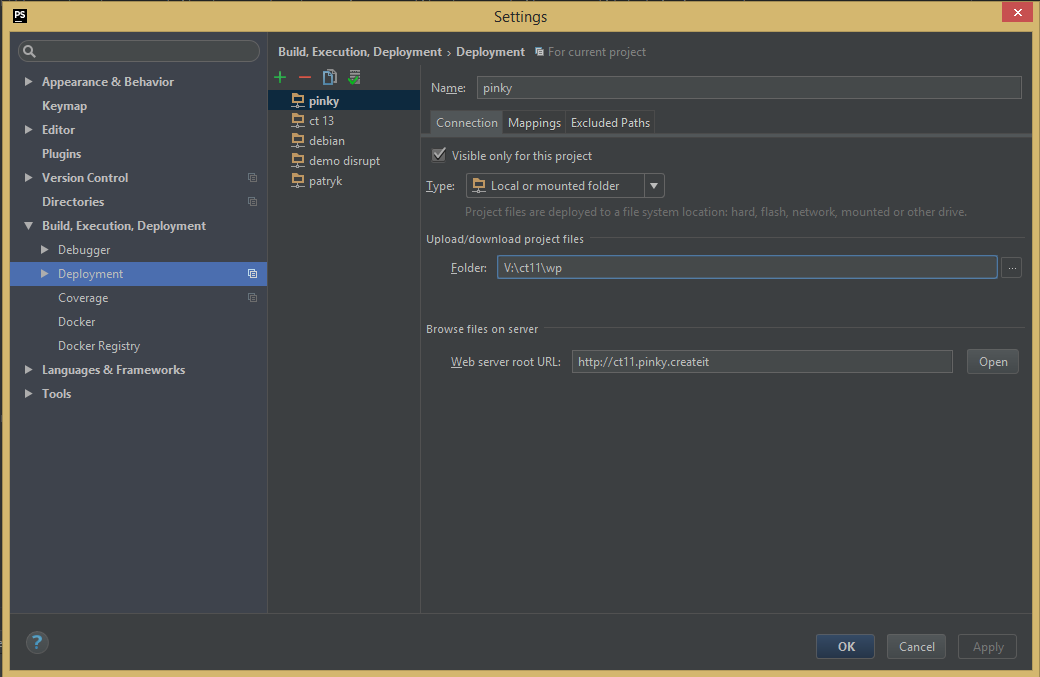
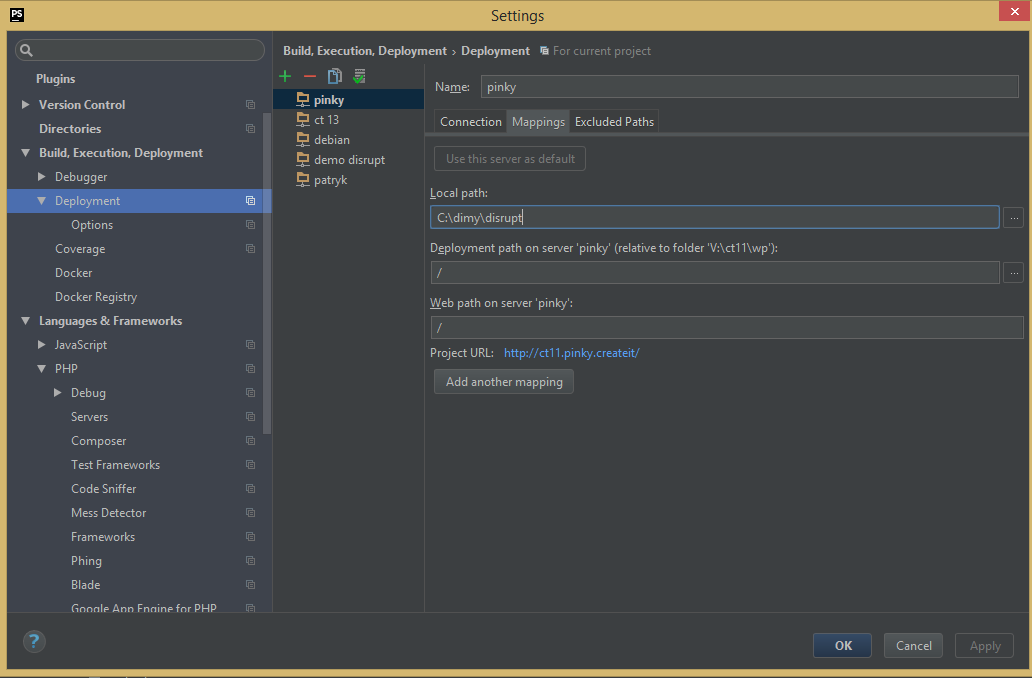
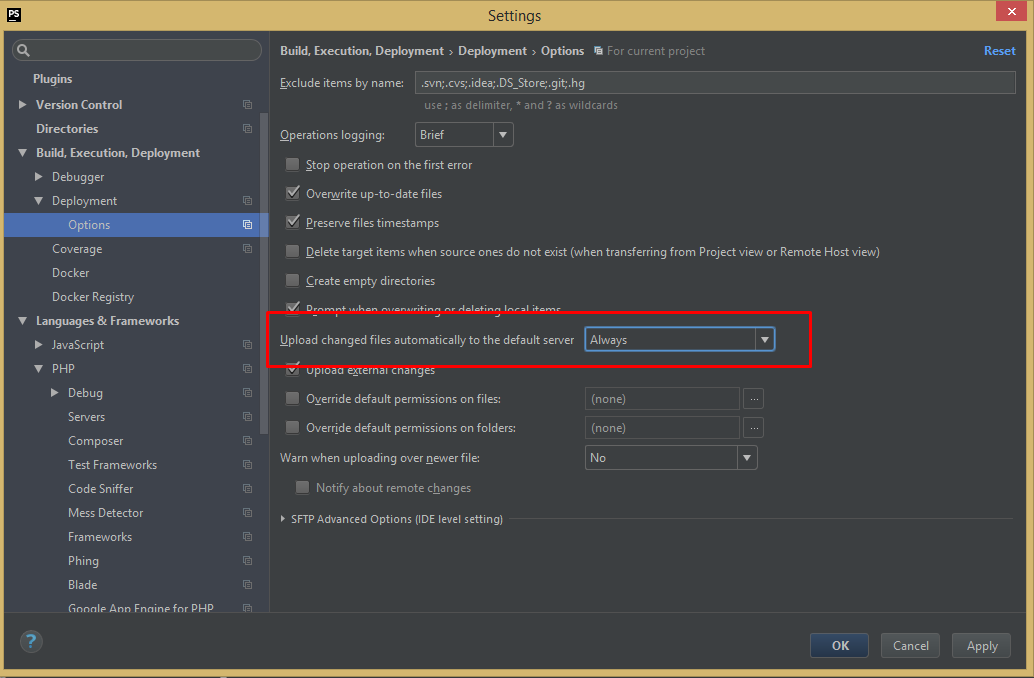
Open File -> Settings -> Build & Execution & Deployment -> Deployment and enter settings as follows changing ct11 to your CT Server Number
Make sure you have set pinky as default deployment (in servers list, right click on your pinky and check set as default)
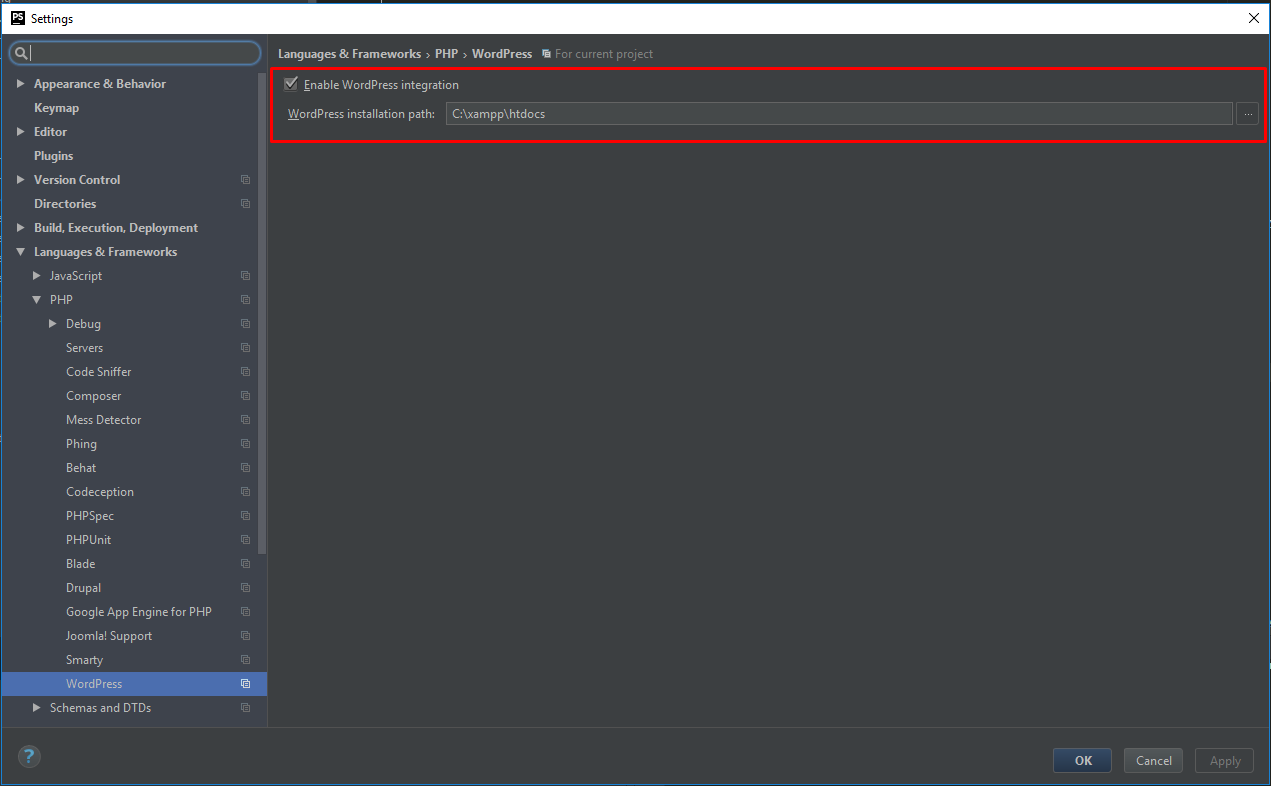
You can add Wordpress support yo your PHPStorm by adding path to folder with fresh Wordpress Installation.
Your PHPStorm is configured
Create a directory C:\work\boilerplate
Copy contents of V:\wp (including hidden files) to C:\work\boilerplate
Run PHPStorm and click: Open…, and select C:\work\boilerplate
In PHPStorm menu click: File -> Settings -> Languages & Frameworks -> PHP -> Frameworks and check: Enable WordPress integration and type path to WP files: C:\work\boilerplate
In PHPStorm menu click: VCS -> Checkout from version control -> Git
Enter Git repository URL: Theme boilerplate
Enter parent directory: C:\work\boilerplate\wp-content\themes
Enter directory name: theme-boilerplate
Click: Clone and enter credentials
After a while you should have C:\work\boilerplate\wp-content\themes\theme-boilerplate directory content cloned from Git
Repeat checkout with Theme Plugin boilerplate and Theme Demo Plugin boilerplate to C:\work\boilerplate\wp-content\plugins directory
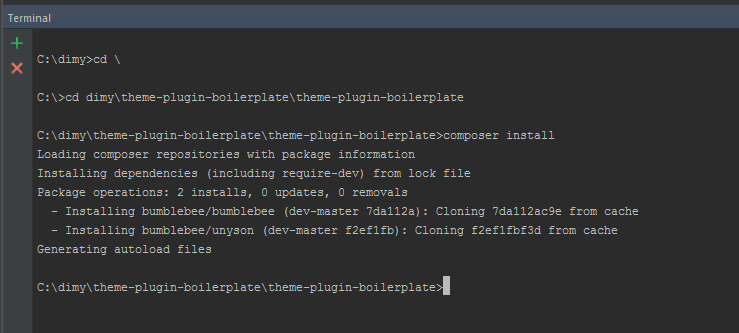
In PHPStorm, press Alt+F12 to open the terminal
Go to Theme Plugin directory (eg. type cd \, press enter, type cd work\boilerplate\wp-content\plugins\theme-plugin-boilerplate, press enter)
Type composer update and press enter
Here’s a screenshot of PHPStorm Terminal:
Unyson and Bumblebee frameworks should now be present in vendor directory.
Repeat these steps for Theme Demo Plugin
Let’s try to send those files to server.
C:\work\boilerplate\wp-content\themes\theme-boilerplate directory and click: Upload to pinkyhttp://CT_SERVER_NUMBER.pinky.createit/wp-admin and select on the top: My Sites -> Network Admin -> ThemesYou can wath a video covering this chapter
When you have your project assigned, follow these steps.
Create a new folder, eg. c:\work\projectname (replace projectname with the actual project name)
Copy contents of c:\work\boilerplate to c:\work\projectname
Optionally, delete contents of c:\work\projectname\wp-content\themes and c:\work\projectname\wp-content\plugins
In PHPStorm choose File -> Open and select c:\work\projectname
Once opened, checkout your project files from Git (most likely, they will be empty)
- Checkout project theme to
c:\work\projectname\wp-content\themes( so in result you havec:\work\projectname\wp-content\themes\projectname\),- Checkout project plugin to
c:\work\projectname\wp-content\plugins( so in result you havec:\work\projectname\wp-content\plugins\projectname-plugin\)- Checkout project demo plugin to
c:\work\projectname\wp-content\plugins( so in result you havec:\work\projectname\wp-content\plugins\projectname-demo-plugin\)
Once checked out, in file explorer, copy boilerplate files to your project folders
- Copy
theme-boilerplatecontents toc:\work\projectname\wp-content\themes\projectname\theme(create directorytheme), so in result you havec:\work\projectname\wp-content\themes\projectname\theme\style.css- Copy
theme-plugin-boilerplatecontents toc:\work\projectname\wp-content\plugins\projectname-plugin- Copy
theme-demo-plugin-boilerplatecontents toc:\work\projectname\wp-content\plugins\projectname-demo-plugin
c:\work\projectnamec:\work\projectname\wp-content\themes\projectname folder and select git -> addc:\work\projectname\wp-content\plugins\projectname-plugin folder and select git -> addCtrl+K, select all files you wish to send to git, then press ‘commit & push’. Alternatively, you can right click on a folder and select git -> push.Add below lines to your wp-config.php content (anywhere above wp-settings.php load line):
# set this for easy plugin installation
define("FS_METHOD",'direct');

# set error show
define('WP_DEBUG', true);
define('WP_DEBUG_LOG', true);
You may take advantage of xdebugger by setting .htaccess something like this:
Note
This may have a little negative effect on site performance
RewriteEngine On
RewriteBase /
RewriteRule ^index\.php$ - [L]

# add a trailing slash to /wp-admin
RewriteRule ^([_0-9a-zA-Z-]+/)?wp-admin$ $1wp-admin/ [R=301,L]

RewriteCond %{REQUEST_FILENAME} -f [OR]
RewriteCond %{REQUEST_FILENAME} -d
RewriteRule ^ - [L]
RewriteRule ^([_0-9a-zA-Z-]+/)?(wp-(content|admin|includes).*) $2 [L]
RewriteRule ^([_0-9a-zA-Z-]+/)?(.*\.php)$ $2 [L]
RewriteRule . index.php [L]

# general errors
php_flag display_startup_errors on
php_flag display_errors on
php_flag log_errors on
php_value error_log  /var/www/YOUR-PATH/logs/PHP_errors.log
php_value error_reporting -1
php_value short_open_tag false

# xdebug dump
php_value xdebug.var_display_max_depth 20
php_value xdebug.var_display_max_children 256
php_value xdebug.var_display_max_data -1
php_value xdebug.max_nesting_level 5000
php_value xdebug.show_local_vars 1
php_value xdebug.collect_params 1
# php_value xdebug.collect_assignments 1
# php_value xdebug.collect_includes 1
# php_value xdebug.collect_return 1

# xdebug debugger
php_value xdebug.remote_connect_back 1

# xdebug profiler
php_value xdebug.profiler_enable 0
php_value xdebug.profiler_enable_trigger 1
php_value xdebug.profiler_enable_trigger_value PHPSTORM
php_value xdebug.profiler_output_dir /var/www/YOUR-PATH/logs/profiler
php_value xdebug.profiler_output_name callgrind.%H%R.callgrind

# xdebug trace
php_value xdebug.auto_trace 0
php_value xdebug.trace_enable_trigger 1
php_value xdebug.trace_enable_trigger_value PHPSTORM
php_value xdebug.trace_output_dir /var/www/YOUR-PATH/logs/trace
php_value xdebug.trace_output_name trace_%H%R
php_value xdebug.trace_format 0
If you need database access, use one of the following tools:
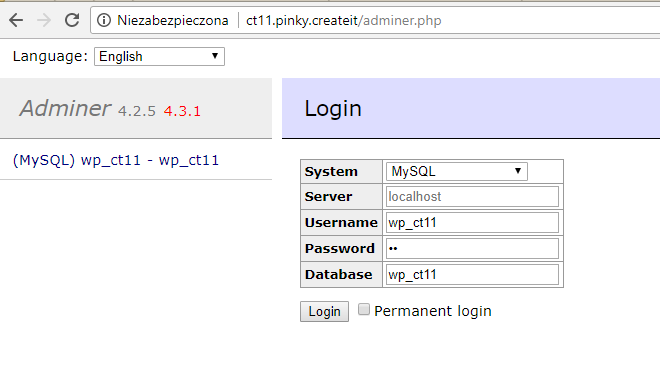
Here is an Adminer basic setup. Adminer is a simple PHP tool.
Download Adminer
Place adminer-#####-mysql.php file in your server wordpress directory, eg. V:\ct11\wp\adminer.php
Open the file in browser, eg. http://ct11.pinky.createit/adminer.php
Enter db credentials (replace ct11 with your pinky number)
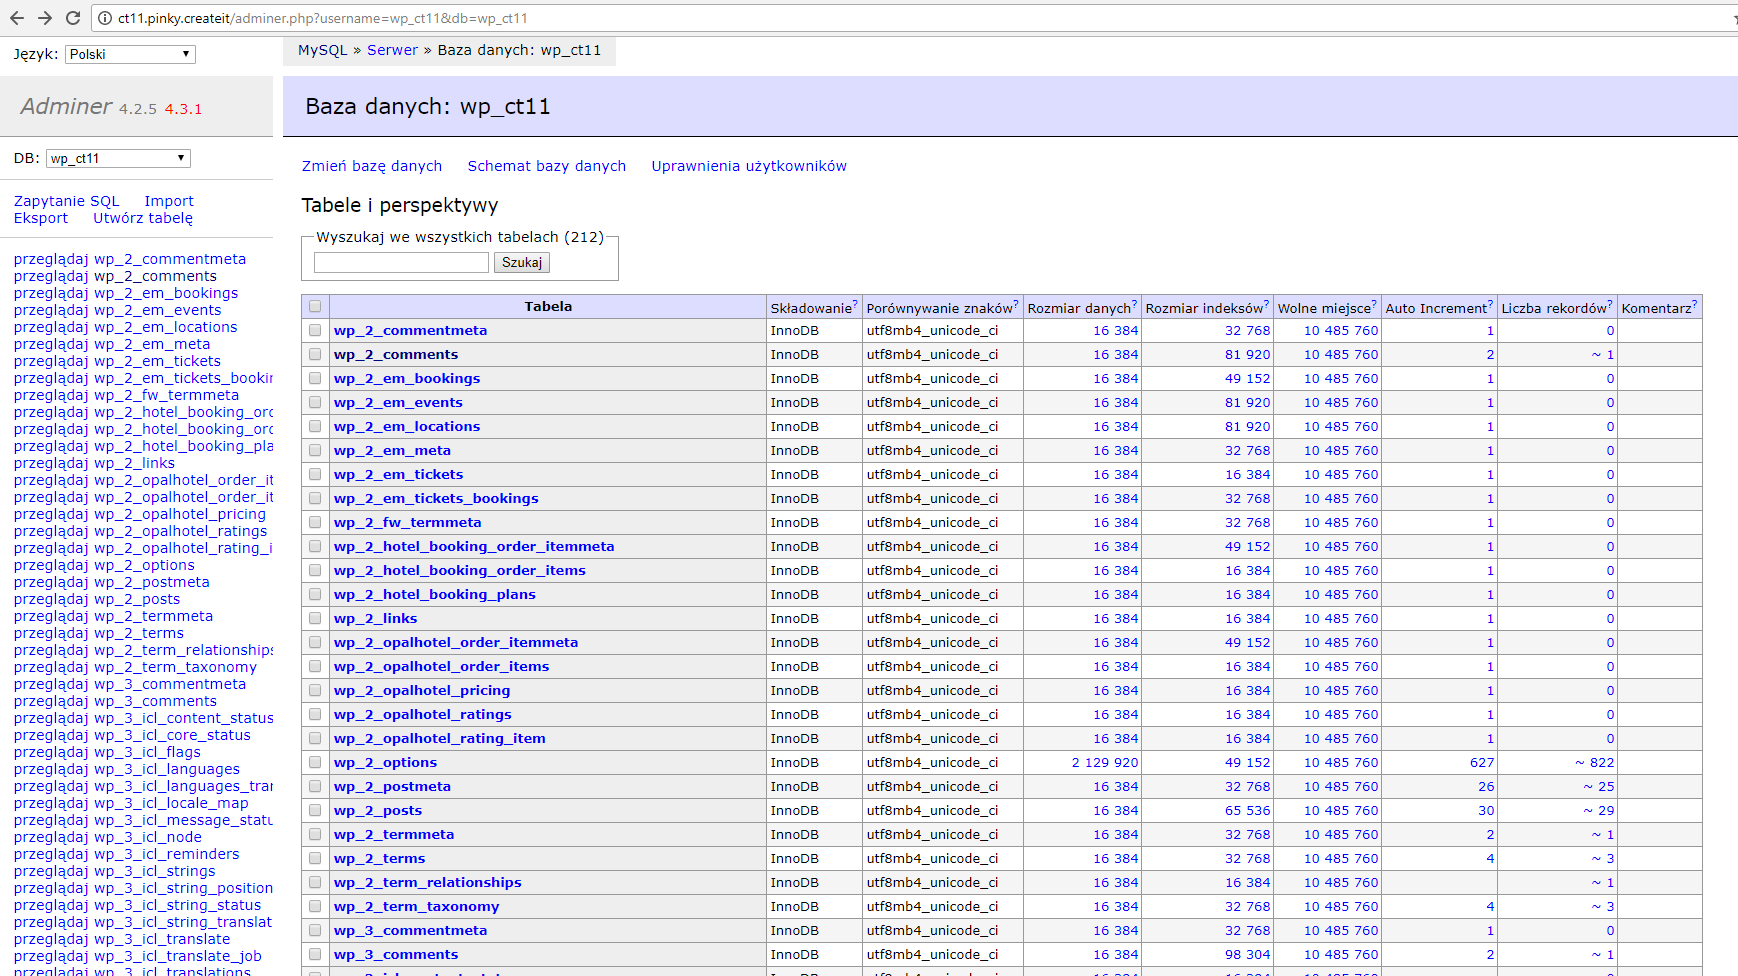
You should see all tables of your database:
That’s it.
Tip
If you need to batch replace contents of your db, use SRDB2 PHP tool.